User interface
- Antonio Maradiaga
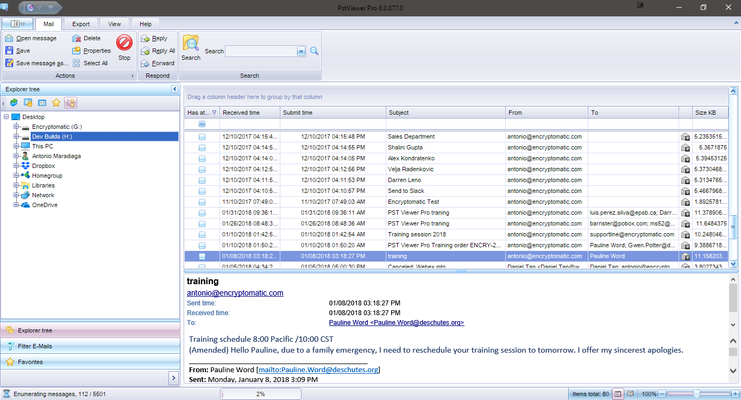
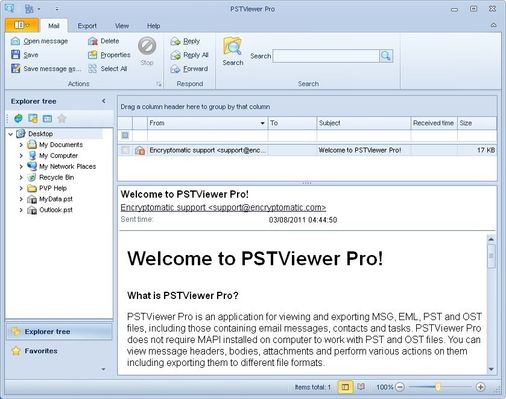
The main window of PSTViewer Pro consists of the following logical zones: Mail list, Message viewer, Explorer tree, Favorites tree, Status bar, Toolbar and Main menu.
Explorer tree represents a tree of folders, available on your computer and network. Upon clicking on a folder, containing messages in format, recognizable by PSTViewer Pro, these messages will be enumerated and added to Mail list.
Mail list is a table, containing information about messages in the active folder. Messages can be sorted, filtered, and grouped by their attributes.
Message viewer displays header, body, and attachments of a message, selected in Mail list.
Status bar shows the description of hovered user interface elements, name and status of the current action, number of messages in the active folder, and other information.
Toolbar and Main menu provide access to a number of application tweaks and customization and can be used to perform mail actions.
Main menu
Main menu of PSTViewer Pro consists of 5 top-level menus - File, Mail, Export, View and Help.
Please note, that the main menu is completely customizable. This article describes elements in the order they are grouped by default. Check User interface tweaks article for more information.
File menu
File menu contains the following items:
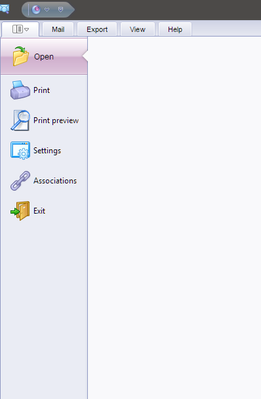
Open menu item is used to open message files of one of the supported formats in PSTViewer Pro. Messages contained in the selected file will be listed in the mail list.
Print menu item prints selected message using default printer and default printing settings.
Print preview menu item opens a Preview window that allows various settings and customizations related to the process of printing. Check the Print preview article for more information.
Settings menu item brings Settings dialog, which allows the user to set the font used in the application and interface reactivity time. See Settings article for more details.
Associations menu item allows the user to associate MSG, EML, and PST files with PSTViewer Pro. See File associations article for more details.
Exit menu item closes all messages opened in PSTViewer Pro and quits the application.
Mail menu

Mail menu contains the following items:
Open message menu item is used to open the selected message in a default email client.
Save menu item allows the user to save the selected message in the specified folder preserving the same file name this message already has.
Save message as... menu item allows the user to save the selected message in the specified folder with a custom file name.
Delete menu item closes all messages opened in PSTViewer Pro and quits the application.
Properties menu item displays Mail information dialog which shows information about message header and file properties and allows to view message's raw transport header and MAPI properties tree.
Select All menu button selects all emails shown in the Mail List window
Search menu item opens Search window
Reply menu item opens default email client with a reply to a sender of a selected message.
Forward menu item opens default email client, forwarding the selected message to selected recipients. Note: see Mail actions section for more information about each of the actions, performed by items of Mail
menu.
Note: only Search menu item is available when no messages are present in the mail list. Open message, Save message as..., Reply and Properties are unavailable when selecting multiple messages.
Export menu

Export menu contains the following items:
Add to a PDF file adds selected messages to PDF file.
Export menu item performs export action on the selected message. Users will be prompted to create, select and/or customize export profiles.
Edit profile menu item allows the user to change predefined profile settings.
New profile menu item allows creating new profiles.
Delete profile allows deleting the currently active export profile.
Restore defaults allows the user to reset export profile settings to default.
View menu

View menu contains the following items:
Use plain text body menu item switches display of all messages in Message viewer to the plain-text body. In plain text mode, the contents of the message body will be displayed without formatting.
Rotate Layout menu allows rotating Mail List and Message viewer panels.
Flip Layout menu allows swapping Mail List and Message viewer panels if they are displayed vertically.
Show row numbers This option allows you to add a number row to the Mail List (See below)
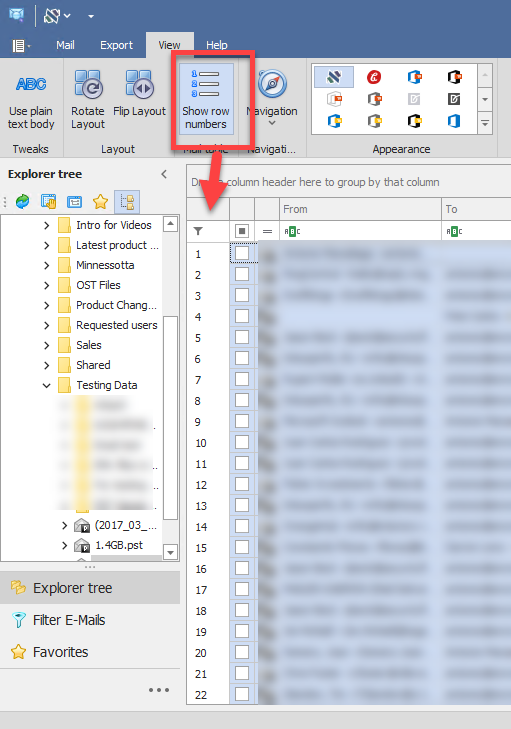
Navigation allows the user to switch between Explorer tree and Favorites.
Appearance menu item allows the user to choose various skins for PST Viewer Pro.
Help tab menu
Help menu contains the following items:
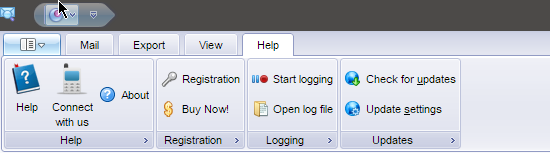
Help menu item opens user's guide.
Connect with us opens a webpage where users can find more information or contact the support team. About menu item shows windows with information about PSTViewer Pro and your license key. Registration menu item opens a dialog that allows registering your copy of the application.
Buy now menu item opens a webpage where users can purchase a copy of PSTViewer Pro. The page will be opened in the default browser.
When Start logging menu item is selected, the application starts logging internal information into a log file. (User will be asked to specify its name and location) This file can be later sent to technical support to help to resolve problematic situations.
Open log file menu item opens log file, generated after selecting Start logging command, in a default text editor.
Check for updates menu item checks for a newer version of PST Viewer Pro.
Update settings menu item opens configuration dialog for updater.
Explorer tree
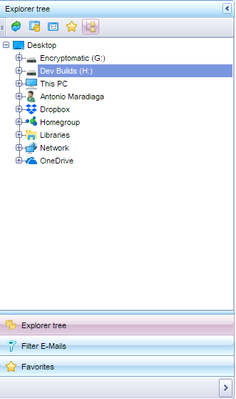
Explorer tree represents a tree of folders, available on your computer and network. Upon clicking on a folder, containing messages in format, recognizable by PSTViewer Pro, these messages will be enumerated and added to the mail list.
Explorer tree lists folders, remote computers, and network shared folders. Messages located in one of these places can be added to Mail list either by selecting an item in a tree or by right-clicking an item and selecting Scan folder from the context menu. If Scan folder with subfolders item is checked, messages in subfolders will be also enumerated.
You can refresh the folder tree to update the display of recently renamed, created, or deleted items by clicking
Refresh button on the toolbar or by selecting it in the context menu.
Open in explorer context menu item and toolbar button are used for the opening selected folder in Windows Explorer.
Properties context menu item and toolbar button show standard system properties dialog for the selected folder.
Add to favorites toolbar button adds selected folder to an active node of the favorites tree. Docking functionality can be used to change the default position for the Explorer tree.
Favorites tree
Favorites tree is a structure that allows quick access to frequently used folders and messages. Messages located in one of the folders can be added to Mail list either by selecting an item in a tree or by right-clicking an item and selecting Browse or Browse with subfolders from the context menu.
To add a folder to favorites, select it in the Explorer tree and click Add to favorites button on the toolbar. Messages can be added to favorites by dragging them from Mail list into the necessary location in the Favorites tree.
Folders can be manually created in the tree by selecting a node and clicking New folder in the context menu. New folder will be created as a child of the selected item.
Edit item name context menu item can be used to change the selected folder's name.
Delete context menu item is used for deleting folders in the tree.
Docking functionality can be used to change the default position for the Explorer tree.
Mail list
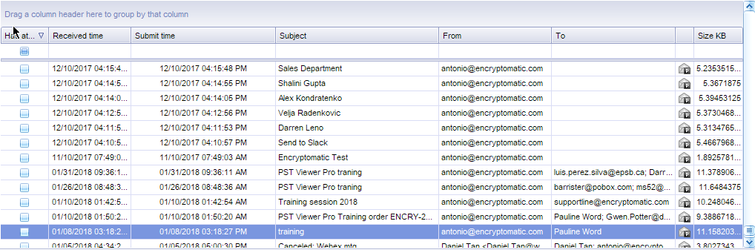
Mail list is a table, containing information about messages in the active folder. Messages can be sorted, filtered, and grouped by their attributes.
Mail list contains the following columns: selector column, file type icon column, and message attributes columns: subject, from, to, CC, BCC, delivery time, submit time, has attachments, internal path, source format, source path. Users can select which columns to show in the table and which to hide.
Icons displayed for the messages in Mail list help to differentiate between file types of the messages and the presence of attachments.
Context menu

Right-clicking on a line in the mail list table brings a context menu for the selected message.
Open message context menu item is used to open the selected message in a default email client.
Mail list view context menu item allows disabling of filtering and grouping capabilities of Mail list component in case the user does not need them.
Save context menu item allows the user to save the selected message in the specified folder preserving the same file name this message already has.
Save message as... context menu item allows the user to save the selected message in the specified folder with a custom file name.
Export context menu item performs export action on the selected message. Users will be prompted to select and/or customize export profiles.
Properties context menu item displays Mail information dialog which shows information about message header and file properties and allows to view message's raw transport header and MAPI properties tree.
Note: Open message, Save message as... and Properties menu items are unavailable when multiple messages are selected.
Advanced Mail list tools
Mail list provides powerful tools for sorting, filtering, grouping messages, and column management.
You can select which columns to display in the table by clicking Column Chooser in the header context menu and dragging required columns from the Customization window to the table. The order of the columns can also be changed using drag and drop.
The simplest way to create a filter is to enter a value in one of the fields above the table. The contents of the table will be filtered according to the inputted data in the corresponding column. The resulting filter can be seen the bottom of the table. It can be disabled and cleaned by unchecking the checkbox near its description or clicking [x] button.
Another way to filter messages is by clicking the filter button in the column header (visible when the mouse is hovering the header). It will bring a list of possible values for the filter current column. This list will differ depending on the column data type. For example, for subject column filtering values would include "Blank fields", "Non-blank fields", list of subjects of messages currently in the table, and a custom filter editor. For the received time column filter would allow selecting a date from the Date picker control or selecting one of the predefined time-filtering options like "Earlier this year" or "Last week".
Any of the earlier created filter rules can be picked from the list, that will appear after clicking on the current filter rule.
Filter editor dialog can be used for more advanced filtering rule editing. It can be used either to create a filter from scratch or to modify an already created filtering rule. Filter editor can be called by selecting Filter editor... in column header context menu or by clicking Edit filter button in the right bottom corner of the Mail list if the filter is already created.
Filter editor creates logical constructs that are used for table filtering. These constructs are one or several logical conditions united by one of the logical operations (AND, OR, NOT AND, NOT OR). Logical conditions consist of comparisons contents of the columns with the proposed value.
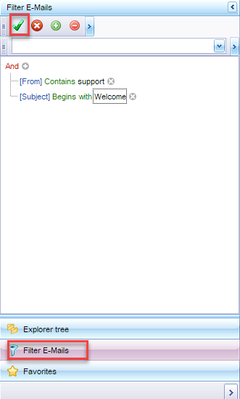
Filter E-mails
The Filter E-mails editor allows you to filter data (display those emails that meet specific requirements), by visually constructing filter criteria in a straightforward graphical form.
The Filter E-mails editor is used to edit the filter criteria. To create and customize filter criteria, use the buttons embedded into the control and context menus supported by the editor's elements.
Add Conditions
To add a condition to a logical group, do one of the following:
Focus any condition within the group or the group's logical operator and then press INSERT. Click the button for the group.
Click the group's logical operator and select Add Condition.
Delete Conditions
To delete a condition, do one of the following:
Focus on the condition and press DELETE. Click the button.
Edit a Condition's Value
To edit a condition's value, click the operand value and type text.
To activate the operand value's edit box without changing the value, click the value or focus the operand value via the keyboard and press F2, SPACE, ENTER or ALT+DOWN
To close the active edit box, press ENTER.
To discard changes to the value and close the active edit box, press ESC.
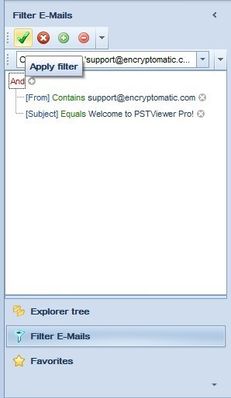
Apply Filter
Click "Apply" to filter data using the created filter condition.
Clear Filter
To clear filter, click the "Clear filter" button.
Message grouping can be done by the values of one or several columns in the table. To perform grouping, drag the column header into to grouping panel. It is possible to perform grouping by several columns. In this case, the nesting order of the grouping columns will be determined by their relative position in the grouping panel. It can be changed by dragging column headers inside the grouping panel. To cancel grouping, drag column headers back into the table.
Docking functionality can be used to change the default position for the Explorer tree.
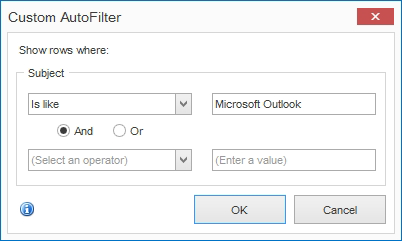
Custom AutoFilter
Custom AutoFilter allows to filter emails in Mail List by custom criteria or selecting filter criteria from the list.
Add Conditions
In Mail List, put mouse pointer at a column header, and click the filter icon

A drop-down list with available options will appear. (Custom) is for Custom AutoFilter.
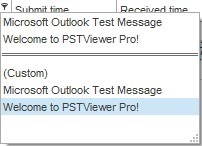
The rest are values, selecting which you can filter emails and display only those that correspond to the selected value. The selected value will appear below the column's header and the filter icon will be highlighted with blue:

To clear the filter, please click on the filter icon and select (All). This will remove the filter and display all emails
in the folder.
Custom AutoFilter lets users to create more complicated filters.
Clear Filter
To clear the filter, please click on the filter icon and select (All). This will remove the filter and display all emails in the folder.
Message viewer
Message viewer displays header, body, and attachments of a message, selected in Mail list. Message viewer consists of two main parts - Message header viewer and Message body viewer.
Header viewer
Message header viewer displays the attributes from the message header (sender, recipient, CC and BCC fields, sent and delivery times) and attachments list.
Clicking on header fields, containing an email address, will result in creating a message in a default email client with the selected address as the recipient.
Clicking on attachment items opens them in a default application associated with corresponding file types. Right-clicking on attachments brings a context menu for the selected object.
Open attachment context menu item is used to open a selected attachment in a default application (same action as clicking on item).
Open with... attachment context menu item brings Open with system dialog, that allows the user to specify which application will be used to open this attachment (and optionally other files of this type).
Save attachment context menu item allows user to save selected attachment item in the specified folder preserving the same file name this attachment item already has.
Save As... attachment context menu item allows user to save selected attachment item in the specified folder with a custom file name.
Save All attachment context menu item allows the user to save all attachment items in the specified folder preserving the same file names these attachment items already have.
Message body viewer
Message header and body can be viewed in a separate window if double-clicked in Mail List.
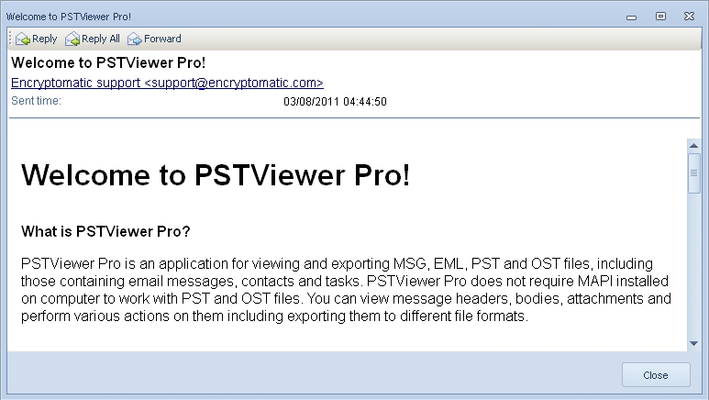
Message body viewer displays body of email message. It is displayed with all available formatting, unless
Use plain text option is activated.
Users can select the message body and copy it into a different application. If that application supports rich text editing (i.e. MS Office applications) source formatting of the message body will be preserved.
Right-clicking on the message body displays the context menu.
Select All message body context menu item selects all text in the message body.
Copy message body context menu item is used to copy selected text of the message body into the clipboard.
View source message body context menu item opens the file, containing source code of the selected message in Notepad.
Docking functionality can be used to change the default position for the Explorer tree
Search messages dialog
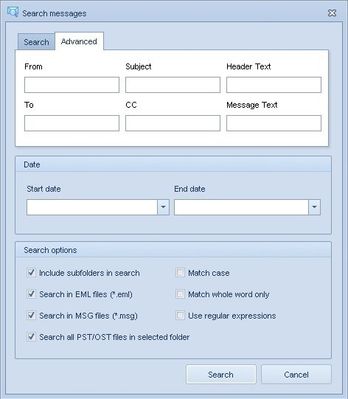
Search messages dialog is used to search the contents of messages.
On Search tab user enters text in Text to search field. The specified text is searched for in message headers and bodies.
On Advanced tab it is possible to specify in which part of the message to perform a search. Text can be searched for in From, Subject, CC, From message properties, the whole Header text or Message body.
Date block is used for date-limited searches. User can specify Start Date, End Date fields or both of them to provide time limitations for searches. Please note, that value in End Date field should always be later than the value Start Date.
If Include subfolders in search option is checked, the search will be performed recursively in the specified folder and its subfolders. Include *.eml and Include *.msg checkboxes allow limiting searches only for files of a certain type.
Match case enforces that hits have exactly the same case as the query. If this is disabled, the search is case insensitive.
Match whole word only will only result in a hit if the match consists of an entire word, not if it's partial (for example (but not limited to), whitespace separated).
In Regular Expression, the query will be handled like a regular expression. List of special characters:
. - any character
\w - word character (letter or digit)
\d - decimal digit
\s - white-space character (space or tab)
* - 0 or more matches of the previous element
+ - 1 or more matches of the previous element
? - 0 or 1 match of the previous element
[ ] - group of symbols, for example [ABC]+ CAB - matches, CAD - doesn't match
\ - escape character "\." if you need dot symbol
| - OR operator, th(e|is|at) matches "the" and "this" in "this is the day"
After Match whole word only and Use regular expressions checkboxes are set to be active, Regular expression will be searched among separate words of text that meets searching results. Modifications (‘^', ‘$', \b) will be removed in case they were previously used.
Sample:
Matching all keywords in one email sample
(?=.*(keyword1))(?=.*(keyword2))(?=.*(keyword3))
Matching any of the keywords on any email sample
(keyword1|keyword2|keyword3)
Status bar

Status bar shows the description of hovered user interface elements, name and progress of current action, number of messages in the active folder, and other information.
Mail actions
Mail action is an operation that can be performed on messages or message groups. Some actions can be performed on single messages only and some - on several messages.
Any actions that take time to perform can be stopped by pressing Stop button on the Toolbar.
Mail actions include:
- Opening
- Replying
- Forwarding
- Printing
- Exporting
- Saving
- Deleting
- Enumerating messages in folders
Opening. Opens message in default email client action.
Replying. An action of replying consists of creating a message following a selected message in a default email client. The sender of the original message with being the recipient of the new one.
Forwarding. An action of forwarding consists of creating a message in a default email client, containing the copy of the original message to allow to forward it to a different recipient.
Printing. An action of printing messages. Printing scale, paper size, background color, watermarks and other options can be customized in Print preview window.
Saving. An action of saving a copy of the selected message in the specified folder. File name may be taken from the source message or specified directly.
Deleting. An action of deleting selected messages. Messages inside containers (PST files) cannot be deleted.
Exporting. An action which consists of saving selected message or messages to one of the file formats according to specified export profile settings.
Enumerating. An action of retrieving a list of messages located in the specified folder and (optionally) its subfolders.
Mail enumeration
Mail enumeration is an action of retrieving a list of messages located in the specified folder and (optionally) its subfolders. A result of enumeration is a Mail list filled with information about messages in the current location.
Enumeration is automatically triggered when the user selects a folder in Explorer tree or Favorites trees. It can be manually triggered by selecting Refresh in Explorer tree context menu or Browse or Browse with subfolders in Favorites tree context menu. In the case of "with subfolders" option was selected, enumeration will be performed in the specified folder and recursively in all of its subfolders. Automatically triggered enumeration will be performed recursively if Switch to scan with subfolders in Explorer tree, context menu is checked.
The length of the process of enumeration depends on the number of messages in the folder. If the process takes a noticeable amount of time, its progress will be displayed in the status bar. The displayed information includes a progress bar with the status of the process, estimated completion time, and estimated number of messages found. Please note, that during the enumeration of PST files, we cannot precisely pinpoint the number of messages inside, until the reading of the file is complete. So, the estimated amount of messages can differ from the exact number after the reading is complete.
Mail exporting
Mail exporting is an action, which consists of saving a selected message or messages to one of the file formats according to specified export profile settings.
Exporting is done according to export profiles. Export profiles store all the settings needed for message exporting. For example, they store information about the format the export will be done to, destination folder, file names generation, and lots of others. You can have several export profiles and quickly switch between them without having to set up all the options from a scratch.
There can be many export profiles, but only one could be active. Export is always done according to rules and settings defined in the active export profile.
If you have export profiles already set, exporting messages can be performed simply by selecting messages you want to export, pressing the export button, and selecting Start in Export Manager dialog.
Supported export formats
- PDF - Portable Document Format, created by Adobe Systems for document PDF is used for representing two-dimensional documents in a manner independent of the application software, hardware, and operating system.
- HTML - Hypertext markup language file; can be opened by any web browser, such as Microsoft Internet Explorer or Mozilla
- MHT - Web archive MHTML file; supported by Microsoft Word, Internet Explorer or
- TXT - Plain text file format; can be opened and edited by any text
- PNG - Portable Network Graphics, a bitmap image format that employs lossless data
- JPG - A commonly used method of compression for photographic
- GIF - A bitmap image file
- TIFF - A file format for storing images, including photographs and line
- CSV - A file format used for the storage of data structured in a table with comma-separated
- Source format - Export message in the same format as source message was stored
- Only attachments - Do not export message body, only
- MBOX- All messages in an mbox mailbox are concatenated and stored as plain text in a single file
Export tools
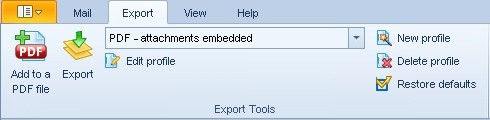
Export tools panel allows users to select the active export profile for export and to create, modify and delete export profiles.
New profile button launches New export profile setup wizard that allows users to generate a new export profile in two steps.
Edit profile button opens Export profile editor dialog which can be used to modify settings of the active profile.
Delete profile button deletes active export profile. A confirmation for deletion will be asked.
After pressing Start button, the export of the messages will be started according to settings of active profile, selected in Export Profiles drop-down list.
Pressing Cancel button will close Export manager dialog without starting the process of export
New export profile setup wizard
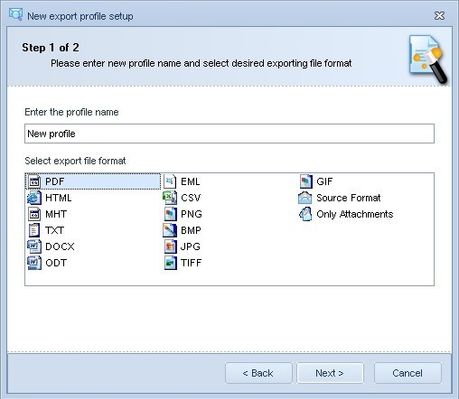
New export profile setup wizard provides a fast a simple way of generating new export profiles. In the first step, the user is prompted to specify the export profile name and export format. In the second step storage of output files can be specified - folder or zip file. If folder or file name is defined, they will be used in export
profile. If not - they will be asked during export. Pressing Finish button concludes export profile generation. More advanced profile settings can be changed by selecting an existing profile in Export manager dialog and pressing Edit profile button.
Export profile editor dialog
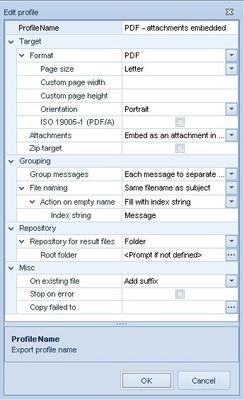
Export profile editor dialog is used to modify settings of export profiles. The majority of settings are common for all formats, but there are some format-specific, like page sizes. A detailed explanation of export settings is listed below.
Common settings
Setting name | Possible values | Description | |
Target | Format | PDF, HTML, MHT, TXT, PNG, JPG, GIF, TIFF, CSV, Source format, Only attachments | File format of the exported messages. |
Attachments | Do not export, As file attachments in subfolder, As file attachments in same folder | Message attachments export type | |
Zip target | Checked/Unchecked | Compress each exported item into zip archive | |
ZipLevel | None, Low, Medium, High | The level of compression. Higher levels of compression require more time to create | |
ZipPasswd | Password for zip file | ||
Groupi ng | File naming | Same filename as email file, Custom naming schema | Exported items file name |
File naming schema | Setup the advanced file naming schema. See Export file naming schema editor section below. | ||
Action on empty file name | Ask, Fill with index string | Action for empty generated file name | |
Reposi tory | Repository for result files | Folder, Zip | Exported item location |
RootFolder | Folder to save items to. Will be prompted if empty. | ||
ZipFile | Zip file name to save items to. Will be prompted if empty. | ||
ZipLevel | None, Low, Medium, High | The level of compression. Higher levels of compression require more time to create | |
ZipPasswd | Password for zip file | ||
Misc. | OnExistingFile | AddSuffix, Overwrite, Ask | Action for existing files |
StopOnError | Checked/Unchecked | Stop export on error | |
CopyFailedTo | Folder to save messages that have failed to be exported. Copying will be skipped if empty. |
Format-specific settings
Forma t | Setting name | Possible values | Description |
PageSize | UserDefined, Letter, A4, A3, Legal, B5, C5, 8x11, B4, A5, Folio, Executive, EnvB4, EnvB5, EnvC6, EnvDL, EnvMonarch, Env9, Env10, Env11 | Page size of output PDF file. If UserDefined in selected, page size will be taken from CustomPageWidth and CustomPageHeight properties. | |
CustomPageWidt h | Page width in points (1/72 inch) |
CustomPageHeig ht | Page height in points (1/72 inch) | ||
Orientation | Portrait, Landscape | Use Portrait for pages with height greater than width, otherwise - Landscape. | |
HTML | Title | HTML document title. (Tag <TITLE>) | |
PNG BMP JPG TIFF GIF | Scale | 1-1000 | Scale of image in percents (from 1 to 1000, default 100) |
LockAspectRatio | Checked/Unchecked | Lock the ratio of width to height of the image when resizing | |
Height | Height of the destination image in pixels, overrides Scale and LockAspectRatio. Leave empty for default image size. | ||
Width | Width of the destination image in pixels, overrides Scale and LockAspectRatio. Leave empty for default image size. | ||
JPG | Quality | 1-100 | Jpeg compression quality in percents (from 1 to 100, default 90) |
CSV | Encoding | Ansi, UTF-8, Unicode | Encoding of the contents of CSV file |
Separator | ",", ";" | Fields separator symbol | |
Export body | Checked/Unchecked | Include body as separate field |
Attachments
Attachments combo-box contains possible formats for message attachments export.
Value | Description |
Don't export | Message attachments will not be exported |
As file attachments in subfolder | Message attachments will be saved as separate files in the subfolder of the same directory as message body is |
As files attachments in same folder | Message attachments will be saved as separate files in the same directory as message body is |
As embedded attachments in document | Message attachments will be embedded to the document as attachments (PDF only) |
As converted and included content | Message attachments will be converted to the document format and included as content (PDF only) |
Export file schema editor dialog
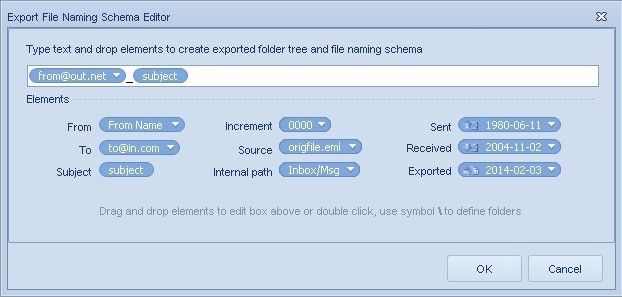
Export file schema editor dialog can be called when the user has selected Custom naming schema in File naming option. Export file schema editor dialog allows to generate folder tree in the output folder and customize output file name using elements with message attributes.
Available elements include:
- From - Name and address of the message
- To - List of message recipients. Can be adjusted to CC or
- Subject - Subject field of the message
- Increment - 'Bates Stamp'-style naming convention of files
- Source - Transfer name of email file or email file format (MSG, EML or PST)
- Internal Path - Internal path of the message, for example,/Inbox folder in the email client
- Sent - Date and time when the message was submitted
- Received - Date and time when the message was received
- Exported - Date and time of export operation
To add an element to the current naming schema, drag and drop it to the edit box or double-click on it. After adding elements to the naming schema, click on it to select possible customization options for those elements that have them. Drag and drop can be used to change the order of the elements in the naming schema.
Any text can be manually added to the edit field to make it a constant part of the custom naming schema. Use "\" symbol as a separator to define folders.
Configuration
Configuration settings are described in this topic, such as:
- Settings - global application settings, such as font, language, and date format
- exe - tool, that allows to add and modify language settings
- File associations - PSTViewer Pro can be set as a default application to open MSG, EML, PST, and OST files
- Print preview - advanced configuration options for printing files
- Updating and update settings - parameters of automatic updating
- Logging - recording of internal information into the text file
Settings
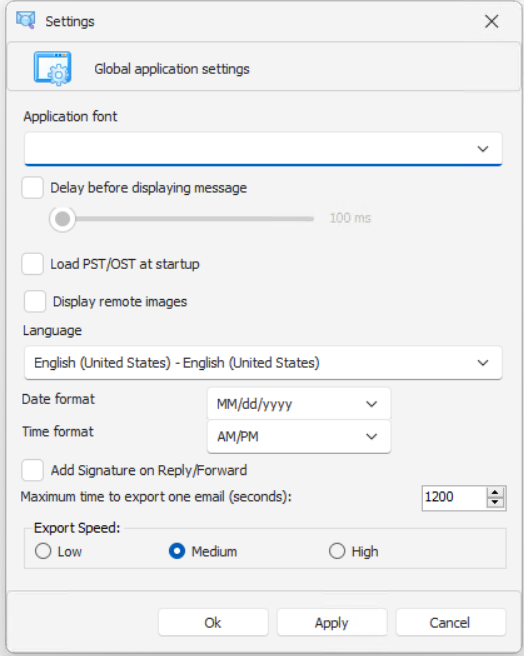
Settings dialog contains global application settings. It can be called from Settings item in the File menu.
Application font drop-down list can be used to specify the font that will be used in the application as an interface font. It is vital, that a Unicode font is selected for correct display contents of messages with non-English symbols. Arial Unicode MS is set as a default font.
Delay before displaying message options are used to set up optimal response time. This is the delay time after the message was loaded after its selection in Mail list and before the appearance of its contents in Message viewer. Lower values will cause the message to appear more quickly, higher values will make navigation through the Mail list more smooth.
Load PST/OST at startup will allow the software to open the last PST or OST file accessed in your last session. This option is disabled by default.
Display Remote images allow users to enumerate and load emails faster as it does not have to collect the data for the images. This option is disabled by default, you can enable displaying the images by placing a check mark in the box.
Language the drop-down list can be used to change GUI language for PVP. The current version supports the next languages:
- English;
- French;
- German;
- Italian;
- Polish;
- Portuguese;
- Russian;
- Spanish;
- Chinese Traditional;
- Chinese Simplified;
- Arab;
- Ukrainian;
- Norwegian;
- Hindi
Date Format You can modify the date format for emails to Display in the View Pane.
Time Format You can modify the time format for emails to Display in the View Pane.
Add a signature on Reply/Forward This option triggers the current signature on your email client when using the included Mail actions.
Maximum time to export one email (seconds) This option allows you extend the time for the program to attempt to convert one email. The default time is 1200, for larger emails, the program will behave better with 3200 or higher.
Export speed This option will allow you to adjust the speed for the export, this speed is corelated to your device's resources, low end devices should perform better in the "Low" setting.
File associations
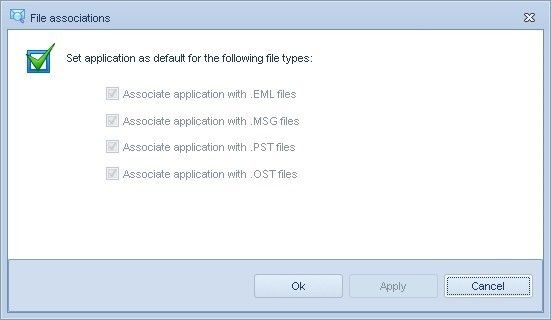
File associations dialog contains global application settings. It can be called from Associations item in the File menu. (available in Windows 8.1 and below)
PSTViewer Pro can be set as a default application to open MSG, EML, PST, and OST files. File associations can be set using the standard Windows file association window.
Please note, that it is impossible to un-associate PSTViewer Pro with file types directly. To do this, you should associate file types in question with a different application using the Windows file association interface.
Print preview
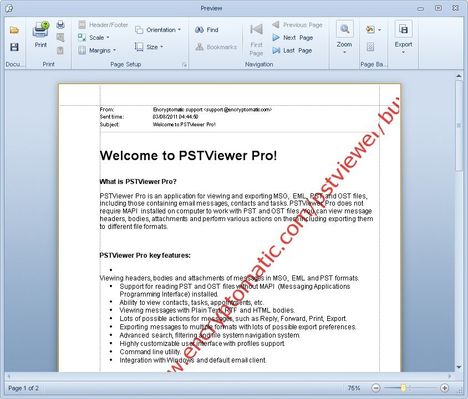
Print preview window provides advanced configuration options for printing files. It can be called from File
menu.
Features:
- Printer selection and preferences
- Printing preview, single- and multi-page. Custom zoom
- Saving and loading documents in prnx format
- Margins adjustments
- Setting of background colors
- Adding text or picture as watermark
- Saving document in picture file (BMP, JPG, GIF, PNG, TIFF, WMF, EMF)
- Emailing document in a picture file
Updating and update settings
PSTViewer Pro has a built-in system for checking if newer versions of the application are available. Users can check for updates either manually, or allow applications to do checks for newer versions periodically.
Manual update checks can be performed by pressing Check for updates item in Help menu. Parameters of automatic updating systems can be set by selecting Update settings Help menu item.
Update options dialog
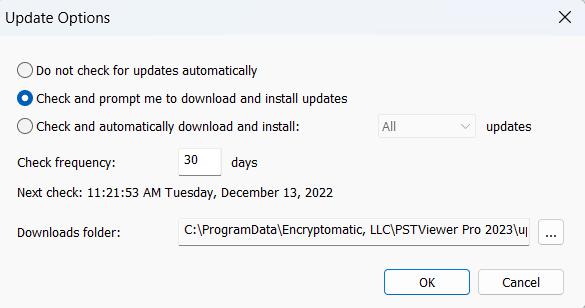
Check frequency group is used to set how frequently the check for updates is performed and if the updates will be installed automatically.
If Do not check for updates automatically option is selected, PSTViewer Pro will never check for newer versions automatically.
If Check and prompt me to download and install the updates option is selected, the application will check for a newer version with frequency, specified in Check frequency field. If the updates are found, the user will be asked if he wants to download and install these updates.
If Check and automatically download and install option is selected, PSTViewer Pro will check for
newer version with frequency, specified in Check frequency field. If the updates are found, they will be downloaded and installed automatically (either all updates or critical only - as specified by user).
Downloads folders field sets the folder, in which temporary update files will be downloaded.
You can also set up update options while installation.
Logging
Logging is the recording of internal information into the text file. This file can be later sent to technical support to help to resolve problematic situations or report bugs with PSTViewer Pro.
The log contains basic information about the user's operating system and internal information about the application's settings and performed actions. No personal information is collected.
Logging can be started by selecting Start logging item in Help menu. The user will be asked to specify the name and location of the log file. After this, PSTViewer will log its activity until the application will be closed.
The generated log file can be opened by selecting Open log file item in Help menu. The log file will be opened in the default text editor.
Enterprise deployment
Enterprise deployment topic describes Deployment, Registration, and Command line switches.
- Deployment - details about Installation Package
- Registration - information about PSTViewer Pro registration
- Command-line switches - switches for .MSI Installer Package
Deployment
PSTViewer Pro installation is distributed as .EXE executable and as .MSI Windows Installer Package.
An executable version of the installation is able to check if required components for PVP deployment are installed in the system. If these dependencies are not installed, the executable version will download and install them.
The installer Package version of the installation is unable to download and install dependencies but can be used in remote software deployment systems. Please make sure, your PC meets minimum software requirements before installing this version.
Registration
This topic covers the aspects of PSTViewer Pro registration.
There are two different versions of PSTViewer Pro available - with and without copy protection system:
- A protected version of PVP requires a registration key to unlock full The software can be evaluated with certain limitations without registering. The methods of registering the application are described below.
- Unprotected versions of PVP have NoLP as part of their installation file They can be installed and used with full functionality for an unlimited period of time without requiring the input of the registration key.
All information below describes the version of PSTViewer Pro with copy protection.
Trial limitations
Without key PSTViewer Pro has 15 days of free trial with a number of exported messages limited to 50 per export. After inputting a valid key these limitations are lifted.
Activation statuses
The activation status of a current copy of PSTViewer Pro can be seen in Help - Registration. These statuses include:
- Active trial Users may evaluate PSTViewer Pro with trial limitations.
- Expired trial The trial period has expired, the user must input the registration key to continue using PSTViewer Pro.
- Fully functional A valid registration key has been inputted. Users may use PSTViewer Pro without any limitations.
Methods of registration
- Registration via command
You can register PVP via the command-line interface that can be accessed via the PSTViewerConsole.exe file, located in the same directory as PSTViewer.exe.
The next options are available for registration:
k, key
Register the application with a specified serial key for the current user. Key will be applied during the next start of the application.
Usage: PSTViewerConsole.exe --key <serial key>
delkey
Erase serial key for the current user.
Usage: PSTViewerConsole.exe --delkey
2. Registration via Registration window.
PSTViewer Pro can be registered manually via Help - Registration window. Write the key in the Serial key field and press the Ok button. The registration procedure will be performed and if the key has been validated successfully, the activation will be completed. You may require an internet connection to perform the activation depending on your key type.
3. Registration while installation process.
You can register PSTViewer Pro for all users while the installation process. The next option is available for such registration:
PIDKEY="<license_key>"
Usage:
PSTViewer.Setup-8.x.x.xxxx.exe PIDKEY="xxxxxxxx-xxxx-xxxx-xxxx-xxxxxxxx"
or
msiexec /i PSTViewer.Setup-8.x.x.xxxx.msi /qn PIDKEY="xxxxxxxx-xxxx-xxxx- xxxx-xxxxxxxx"
where xxxxxxxx-xxxx-xxxx-xxxx-xxxxxxxx is your license key.
Transferring activation
Transferring activation topic describes how to release license activation in order to activate it again for another user.
- Releasing license activation - how to release license activation in order to activate it again for another
Releasing license activation
Releasing license activation using a graphical interface
This option is available after successful PstViewer Pro registration and is used in order to transfer PstViewer Pro activation to another user.
If you are changing the computer or operating system, please release PstViewer Pro activation first. To release activation for PstViewer Pro:
- Switch to the "Help" tab;
- Click the "Registration" button;
You will be prompted for confirmation about license release ("Are you sure you want to release the license? Releasing the license will unregister this software so that you can activate it on another computer. The software may stop working on this computer");
- Click "Yes".
![]()
Releasing license activation from command line
The command-line interface of PSTViewer Pro can be accessed via the PSTViewerConsole.exe file, located in the same directory as PSTViewer.exe.
Usage: PSTViewerConsole.exe [options] delkey
Erase serial key for the current user.
Usage: PSTViewerConsole.exe --delkey