Interface
- Antonio Maradiaga
This topic contains information about MessageExport interface.
Toolbar
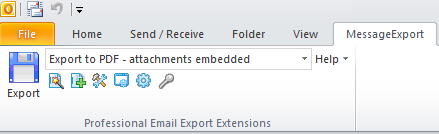
The MessageExport toolbar is used for quick email conversion. It is found in the top part of Outlook window just below Outlook toolbars.
For MS Outlook 2016 through 2010, MessageExport toolbar looks like this:

The MessageExport toolbar contains following features:
Profile wizard button. Displays wizard for creating new profile.
Show export folder button. Toggles the appearance of the Export folder explorer, which allows quick export of messages by dragging them to a folder item.
Profiles drop-down menu. It lists all export profiles that have been selected for quick export. To select a profile for quick export, select Options in MessageExport main menu, select profile to change and click Configure button and check the box titled Used for quick export.
Configure (wrench and hammer icon) button. Launches the profile dialog for active profile.
Show export folder explorer button. Toggles the display of Export folder explorer panel. Export folder explorer allows quick export of messages by dragging them to a folder.
Export button. Starts export according to active export profile. Export button has a diskette icon.
Help button causes this drop down menu to appear.

It consists of following items:
User Guide menu item. Opens the MessageExport help file.
Online Support menu item. Opens Support Center and allows filling in comment form on our website.
Send log to Support menu item compiles log file and provides an ability to send it to Support Team.
About menu item. Opens window with information about MessageExport.
For Microsoft Outlook 2016, the MessageExport toolbar is part of the main Outlook ribbon:
Toolbar contains several additional elements:
Profile wizard button. Simplifies Export Profiles creation by guiding through the series of simple steps in wizard mode.
New profile button. Creates new profile for exporting.
Register button leads to Register Tab to provide an ability for application to be registered.
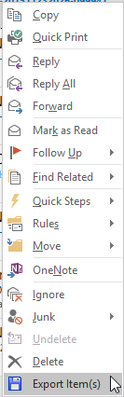
Context menu
MessageExport adds Export item(s) options to the Outlook right-click context menu. You can export email messages according to the selected active profile by right clicking on an email in the Outlook mail list.

Profile Wizard
MessageExport lets you create custom export profiles. Click the "Profile Wizard" icon on the MessageExport toolbar to start the wizard. Answer the questions, and soon you will have completed your new custom export profile.
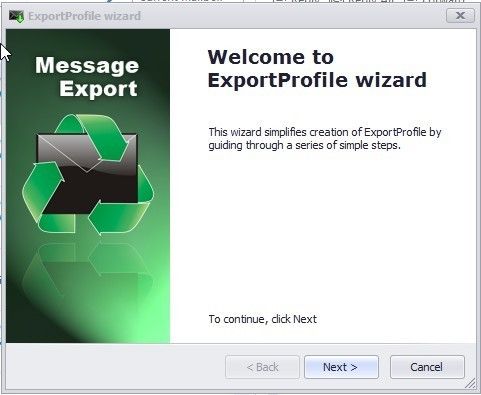
Click Next to continue the wizard.
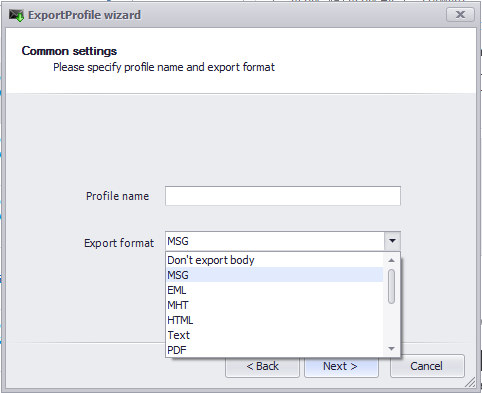
Provide name of the new profile and select the export format for your emails.
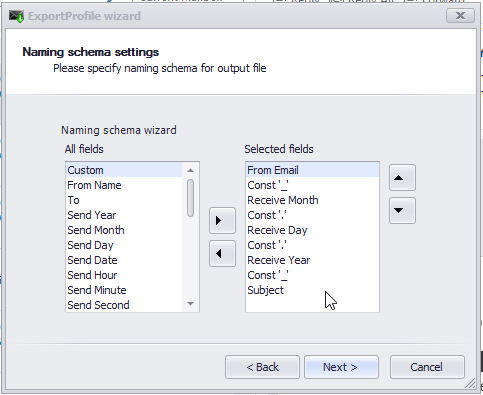
You can customize how MessageExport name the converted files. The fields in the “All Fields” column are bits of the email that will be included in the file name. Use “Constructors” to place spaces or otherwise join the fields in the file name.
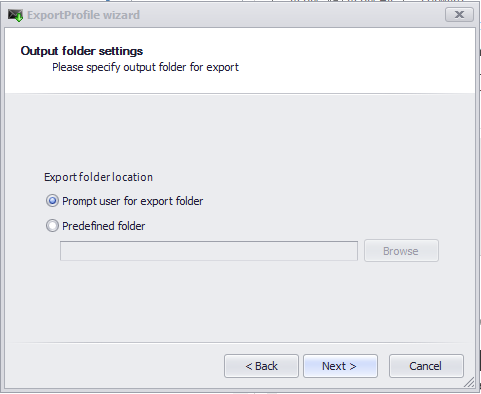
You can define a permanent folder where MessageExport will always save converted emails when this Export Profile is used. The other option is always prompt you to select a folder.
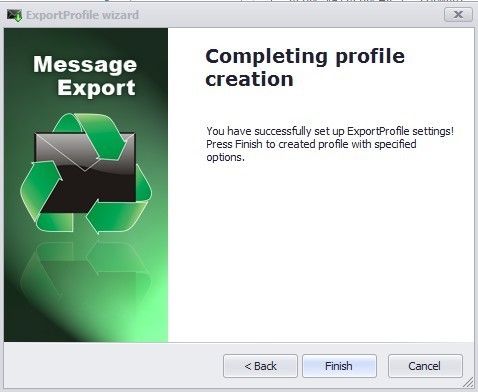
Click Finish to complete the process.

Your new MessageExport export profile will now be displayed in the dropdown list.
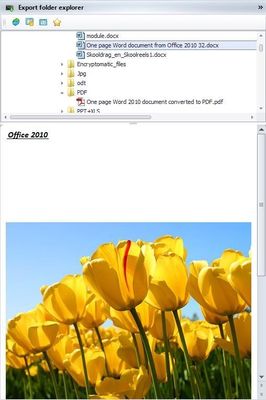
Export Folder Explorer
MessageExport’s folder explorer panel is a panel used for quick exporting of messages.
Click the "Show export folder explorer" icon  on MessageExport toolbar to show or hide Export folder explorer:
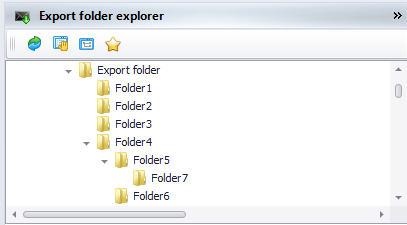
The Export explorer panel displays folders available for quick email conversion in a tree view. Displayed folders include: desktop folder, local disks, removable disks and network drives. Network places browsing is not supported.
Exporting items by Export Folder Explorer may be performed with simple drag-and-dropping actions. Just drag an email from the Outlook mail list, and drop it on the target folder. MessageExport will automatically convert the email to the export profile currently showing in the MessageExport window.
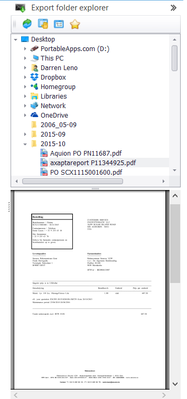
You can also use the Export folder explorer to view files in the folder, and to preview common file types, such as PDF files. This means that as you drag an email from Outlook to the Export folder explorer, and the file is converted to the selected format (such as PDF), you can immediately and easily preview the newly created file in Export folder explorer by clicking on it.
Show export folder
This button toggles the appearance of the Export Folder Explorer panel in Outlook. It is not shown when the active profile has Compress all items into same archive or Export to predefined folder options selected.
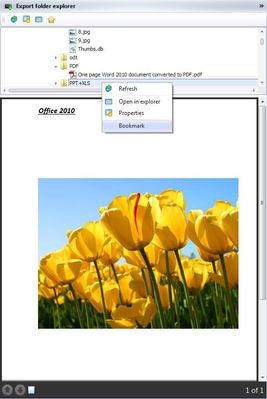
Right context menu
Right clicking on a file in the Export folder explorer reveals a context menu that will allow you to attach the file to an email, or open the file.
This is useful time saving feature. If you have just converted an Outlook email message using Export folder explorer, and now you wish to either email or open the file, use the right context menu to accomplish this tasks quickly.
Documents preview
Folders and files can be viewed in Outlook with MessageExport. It displays folders and files and allows preview for
.doc, .pdf, .txt, .xls, .ppt. files in Export folder explorer.
To preview document, highlight it in Export folder explorer:
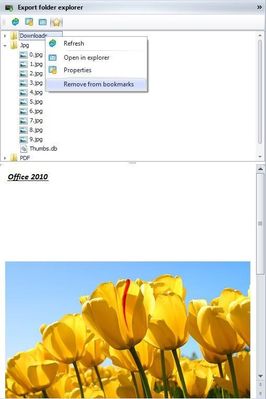
Favorites
Folders can be added to Favorites in Export folder explorer.
To add folder to Favorites, right-click on a folder, and click "Bookmark".
You can show or hide Favorites if you click at star icon  in Export folder explorer.
To remove a folder from bookmarks, right-click on a folder and click "Remove from bookmarks".
Options dialog
MessageExport options dialog contains Profiles, Enterprise Vault, Log, Register and About tabs.
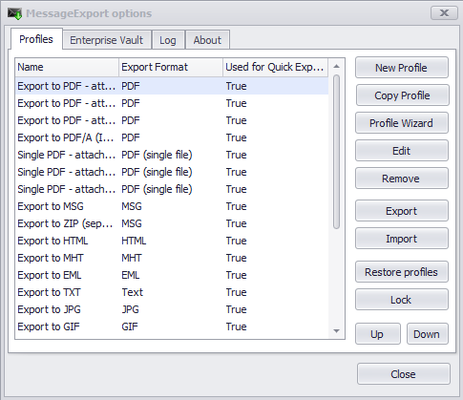
Profiles tab
Profiles tab lets you manage your MessageExport profiles. You can add, change, delete or lock profiles on this tab.
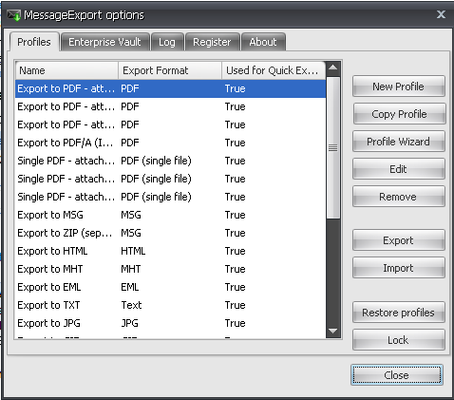
The table on this tab contains a list of all profiles in MessageExport.
Creating new profiles is done by clicking on New Profile button. Profile dialog with default settings will appear and any necessary modifications can be made. Newly created profile is saved by clicking OK button in a Profile dialog.
Copy a profile with its settings by clicking Copy Profile.
Profile wizard button. Simplifies Export Profiles creation by guiding you through the series of simple steps also found in the profile Wizard.
Modification of existing profiles can be made by selecting the profile and clicking Edit. Profile can be deleted by selecting it and clicking Remove.
Profiles can be exported by pressing Export. Exporting profiles means saving them to separate .xml (for unprotected profiles) or .dat (for protected profiles) file. This file can then be used to deploy profiles on other computers. Profiles can be imported by pressing Import button.
Restore profiles button is used to reset all export profiles to their original state. All modified and custom created profiles will be removed.
Export profiles can be locked/unlocked by pressing Lock / Unlock button.
Enterprise vault tab
Enterprise vault tab. MessageExport can handle archived messages stored in Symantec EnterpriseVault servers. MessageExport handles archived messages automatically buy default. However, there is an ability to override some parameters in the Enterprise Vault tab:

Server host (URL) field. If empty, MessageExport will use the default server host.
Enterprise Vault application name field indicates the web application name. EnterpriseVault is the default value for the majority of EnterpriseVault deployments and should be used by default.
Login and Password fields are to be filled in with credentials.
Use Windows session credentials checkbox allows to enable or disable facility to use Windows session credentials for login.
Restore default button allows retrieving settings to default.
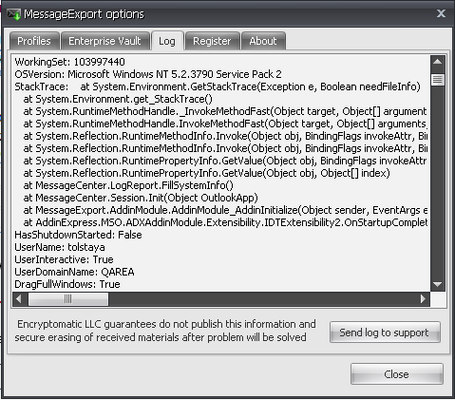
Log tab
Log tab contains MessageExport technical log. It may be useful while contacting technical support
Register tab and Free Trial information
Register tab is used for MessageExport license registration.
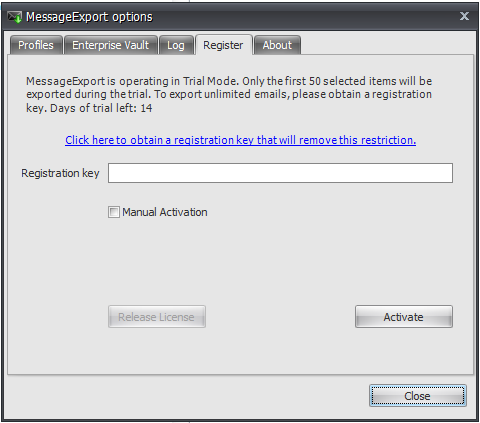
After installing, MessageExport operates in trial mode with limited functionality. In trial mode, you may export up to 50 emails in a single batch export. This restriction is removed after the software is activated with a license code. You can use the trial version for 14 days. The number of days remaining in the trial is shown in the Register tab.
After trial is over, MessageExport goes into “Free Mode,” enabling you to save email messages individually (no bulk export). Free Mode operation will not expire, so there is no need to uninstall MessageExport from your computer.
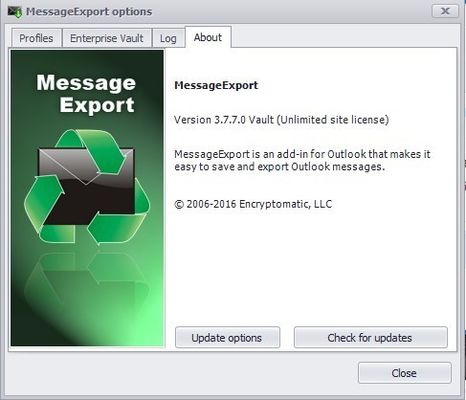
About tab
About tab contains version and copyright information about MessageExport add-in.
MessageExport automatically checks for updates when Outlook starts, but you can manually check for updates by clicking the Check for Updates button.
When MessageExport is purchased, updates are supplied for one year, and may be continued after one year at your option. Contact supportline@encryptomatic.com to renew your updates service.
Export Profiles
MessageExport accomplishes its work by executing instruction sets called Export Profiles. This topic contains information about the Profiles Tab settings and discusses how you can customize them or create new export profiles.
What is an Export Profile
Export profiles are a key feature of MessageExport that present you with a lot of power and flexibility to simplify your work process. Export profiles store the settings needed for an email export operation. They tell MessageExport what to do, how and when to do it. You can have several export profiles and quickly switch between them without having to set up all the options from a scratch. There are no limits to the number of export profiles you can have. They can be copied, edited or deleted at any time.
Some things you can do with export profiles: store information about the export format (such as setting PDF page size), choose a destination folder, customize message file names, specify actions that will be done after export and much more. See also the Profile dialog related topics in the Interface section for more information.
Naming Schema (Custom File Names)
Use Naming Schema to create custom file or folder names using different message attributes. These attributes include send and receive date and time, sender's email address, message recipient and lots of others. There are two kinds of naming schemas: Wizard and Advanced.
Wizard naming schema
The naming schema wizard is a simplest way to setup a custom naming structure that will be applied to exported files and folders.

Wizard naming schema consists of two lists with field names. The left column list contains all fields available for use. The right list contains fields selected for name generation. The order of the fields in right list corresponds to their order in the file name.
Right arrow button adds field to Selected fields column.
Left arrow button removes field from Selected fields column.
Upper arrow button moves selected field higher in Selected fields column. Down arrow button moves selected field lower in Selected fields column.
Some fields are single-use, so they can be used only once in name generation. In most cases, these are message attribute fields.
Other fields can be used without any amount limitations. In most cases, these are constant fields, such as '_' symbol. Note: An extension corresponding to selected export format will be added to generated file name.
Example: Export is made to Text format using Wizard naming schema displayed above. Message has sender name 'John' and was received on the 1st of January 2008. Exported file name in this case will be 'John 01.01.2008.txt'.
Advanced Naming Schema
Advanced naming schema is a tool for more advanced users. It offers more flexibility in name generation.
Advanced naming schema is created from a text string, which consists of predefined masks for different fields. A full list of masks is listed in the table below. All symbols in a string that are not included in a mask list will be applied to a file name 'as is'.
Field name | Mask | Description |
From Name | %FN | Message sender name. |
From Email | %FE | Message sender email address. |
Subject | %S | Message subject. |
To | %T | Message recipient. |
Send Year | %SDY | Message send date: year. |
Send Month | %SDM | Message send date: month. |
Send Day | %SDD | Message send date: day. |
Send Hour | %STH | Message send time: hour. |
Send Minute | %STM | Message send time: minute. |
Send Second | %STS | Message send time: second. |
Send Time | %ST | Message send time in %STH.%STM.%STS format. |
Send Date | %SDF | Message send date in current date display format. |
Receive Year | %RDY | Message receive date: year. |
Receive Month | %RDM | Message receive date: month. |
Receive Day | %RDD | Message receive date: day. |
Receive Hour | %RTH | Message receive time: hour. |
Receive Minute | %RTM | Message receive time: minute. |
Receive Second | %RTS | Message receive time: second. |
Receive Time | %RT | Message receive time in %RTH.%RTM.%RTS format. |
Receive Date | %RDF | Message receive date in current date display format. |
Importance | %I | Message importance. |
Export Year | %EDY | Message export date: year. |
Export Month | %EDM | Message export date: month. |
Export Day | %EDD | Message export date: day. |
Export Hour | %ETH | Message export time: hour. |
Export Minute | %ETM | Message export time: minute. |
Export Second | %ETS | Message export time: second. |
Export Time | %ET | Message export time in %ETH.%ETM.%ETS format. |
Export Date | %EDF | Message export date in current date display format. |
File Attachment Count | %EAC | Returns a number value relating to quantity of file attachments contained in the email. |
Note: An extension corresponding to selected export format will be added to a generated file name.
Example: Advanced naming schema corresponding to Wizard naming schema shown in the above image will be
%FN %RDM.%RDD.%RDY.
Importing and Exporting Profiles

Export profiles can be complex. Wouldn’t it be nice to easily share a useful profile that you designed with one of your co-workers? Well, you can!
Profiles can be exported by pressing the Export button. Exporting profiles means saving them to separate .xml (for unprotected profiles) or .dat (for protected profiles) file. These .dat files can then be imported to MessageExport on other computers.
Profile importing can be done by pressing Import button. A dialog will appear, that will allow selecting profiles file. If password-protected profile was imported, MessageExport will lock profiles with password from the imported file. All modified and custom created profiles will be removed and replaced with profiles from selected file. Profile importing can only be performed when MessageExport profiles are not in a locked state.
Note: profiles can be deployed during MessageExport installation.
Export Profile Locking
Sometimes an administrator may not want users to be able to change an Export Profile. MessagExport supports a password feature to protect editing of Export Profiles.
Profiles storage file is also encrypted to prevent unwanted modifications.
Note: Store your password carefully. You won't be able to modify or unlock your profiles in any way without it! There is no backdoor or way to recover locked profiles without the password.
Profile locking can be performed by clicking Lock button in Options dialog. You need to input a password twice and press Lock button. If password matches, profiles will be locked.
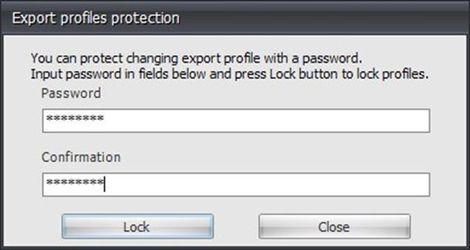
Profile locking can be performed by clicking Unlock button in Options dialog. You need to input a password twice and press Unlock button. If password matches, profiles will be unlocked.
Profile Dialog
Profile dialog contains all the settings you can change in an export profile. Profile dialog can be called either by clicking the Configure button on the toolbar, or by selecting the Add or Configure button on the Options dialog. Also, it can be optionally displayed before profile export if the corresponding option was enabled.
All options are logically divided into six tabs: Common, Export name, Compress output, Output folder, SharePoint and After Export
Common Tab
Common tab of profile dialog is where you can customize many of the settings in an export profile.
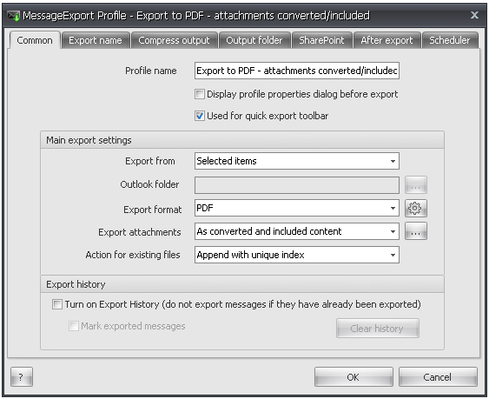
You can edit the name of the profile in the Profile name field.
Display profile properties dialog before export checkbox toggles display of the profile dialog before MessageExport.
Note: Profile properties dialog will appear even if Profile locking was enabled. Disable this option if you want to keep profile settings hidden.
If Used for quick export checkbox is checked, the selected profile will appear in a drop-down menu on an add-in toolbar.
Export from combo-box allows you to specify which elements will be exported. Possible values are shown below.
Value | Description |
Selected items | The messages selected in Outlook explorer window will be exported. |
Selected folders | The messages in folder selected in Outlook explorer window will be exported. |
Selected folders with subfolders | The messages in folder selected in Outlook explorer window and its subfolders will be exported. |
Predefined folder | The messages from the specified folder will be exported. |
Predefined folder with subfolders | The messages from specified folder and all subfolders will be exported. |
Incoming messages | The messages from ‘Inbox’ folder will be exported every time you retrieve mail |
Note. If the folder is not specified in ‘Outputs’ tab, MessageExport will prompt you to select a folder each time an
email is received. For incoming messages to be exported silently, specify the target folder in the ‘Output folder’ tab.
Outlook folder Indicates which Outlook folder will be used for exporting email.
Select Outlook folder Lets you select an Outlook folder manually each time the profile is run.
Export format combo-box contains available formats for message body export. All export formats are listed below
Value | Description |
Don't export body | Message body will not be exported. |
MSG | Microsoft Outlook message file; compatible with other programs that use Microsoft's Messaging Applications Programming Interface (MAPI). |
EML | E-mail message saved by Microsoft Outlook Express, Thunderbird, Lotus, and other e-mail programs; may also contain e-mail attachments, or files sent with the message. |
HTML | Hypertext markup language file; can be opened by any web browser, such as Microsoft Internet Explorer or Mozilla Firefox. |
MHT | Web archive MHTML file; supported by Microsoft Word, Internet Explorer or Opera. |
TXT | Plain text file format; can be opened and edited by any text editor. |
Portable Document Format, created by Adobe Systems for document exchange. PDF is used for representing two-dimensional documents in a manner independent of the application software, hardware, and operating system. | |
Single PDF | Portable Document Format. All messages will be exported to a single file. |
JPG | A commonly used method of compression for photographic images. |
GIF | A bitmap image file format. |
TIFF | A file format for storing images, including photographs and line art. |
mbox | A file format used for holding collections of electronic mail messages. |
CSV | A file format used for the storage of data structured in a table with comma- separated values. |
To printer | Print selected items. |
Format Options button is used to set format properties for output PDF and CSV formats only.
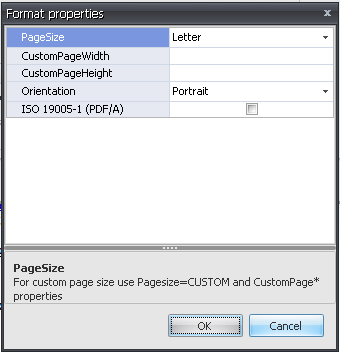
PageSize drop-down list allows indicating paper format type.
CustomPageWidth field allows specifying page width for output file.
CustomPageheight field allows specifying page height for output file.
Orientation option states Portrait or Landscape page orientation for output file.
If ISO 19005-1 (PDF/A) checkbox is checked, MessageExport generates a PDF of electronic document file format for long-term preservation according to ISO Standards.
Export attachments combo-box contains possible formats for message attachments export.
Value | Description | ||
Don't export | Message attachments will not be exported | ||
As file attachments in subfolder | Message attachments will be saved as separate files in the subfolder of the same directory as message body is | ||
As files attachments in same folder | Message attachments will be saved as separate files in the same directory as message body is | ||
As embedded attachments in document | Message attachments will be embedded to the document as attachments (PDF only) | ||
As converted and included content | Message attachments will be converted to the document format and included as content (PDF only) |
Exporting email attachments as separate files is disabled for formats in which attachments are a part of the message file.
For PDF format, embedding attachments or converting attachments to PDF pages is available.
Attachments advanced options This button invokes the attachments’ management dialog.
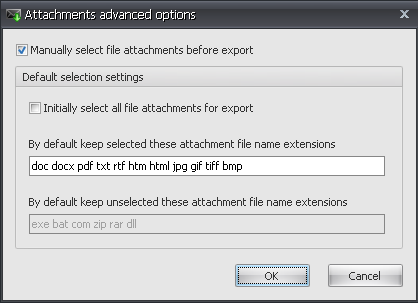
Manually select file attachment before export checkbox. Enabling this option allows to specify features for exported attachments.
Default selection settings section sets up settings for exported attachments.
Initially select all file attachments for export checkbox enabling allows selecting all file attachments and excluding attachments that may potentially harm your computer.
By default keep selected these attachments file name extensions field is enabled if Initially select all file a attachment before export is set to Off. Brings facility to add or remove file formats for exported attachments.
By default keep unselected these attachments file name extensions field is enabled if Initially select all file a attachment before export is set to On. Brings facility to add or remove file formats for exported attachments.
Action for existing files allows user to specify what to do when a file with the same name as generated message file does already exists.
Value | Description |
Rewrite file | Existing file will be rewritten by new message file. |
Ask | A dialog box will appear during export that will allow to select action in each problem case. |
Append with unique index | Message file name will be appended with index: _001, _002 and so on. |
Turn on history checkbox enables or disables export history. If export history is enabled, the export of messages that have already been exported will be disabled. Export history affects only current export profile.
If Mark exported messages checkbox is active, messages exported by MessageExport will be added to Exported
category. Category will be cleaned from all messages, when history is erased by clicking Clear history button.
Clear history button clears export history. Enabled only if export history is active.